Easy Freezer Breakfast Sandwiches-Quick Make Ahead Meals
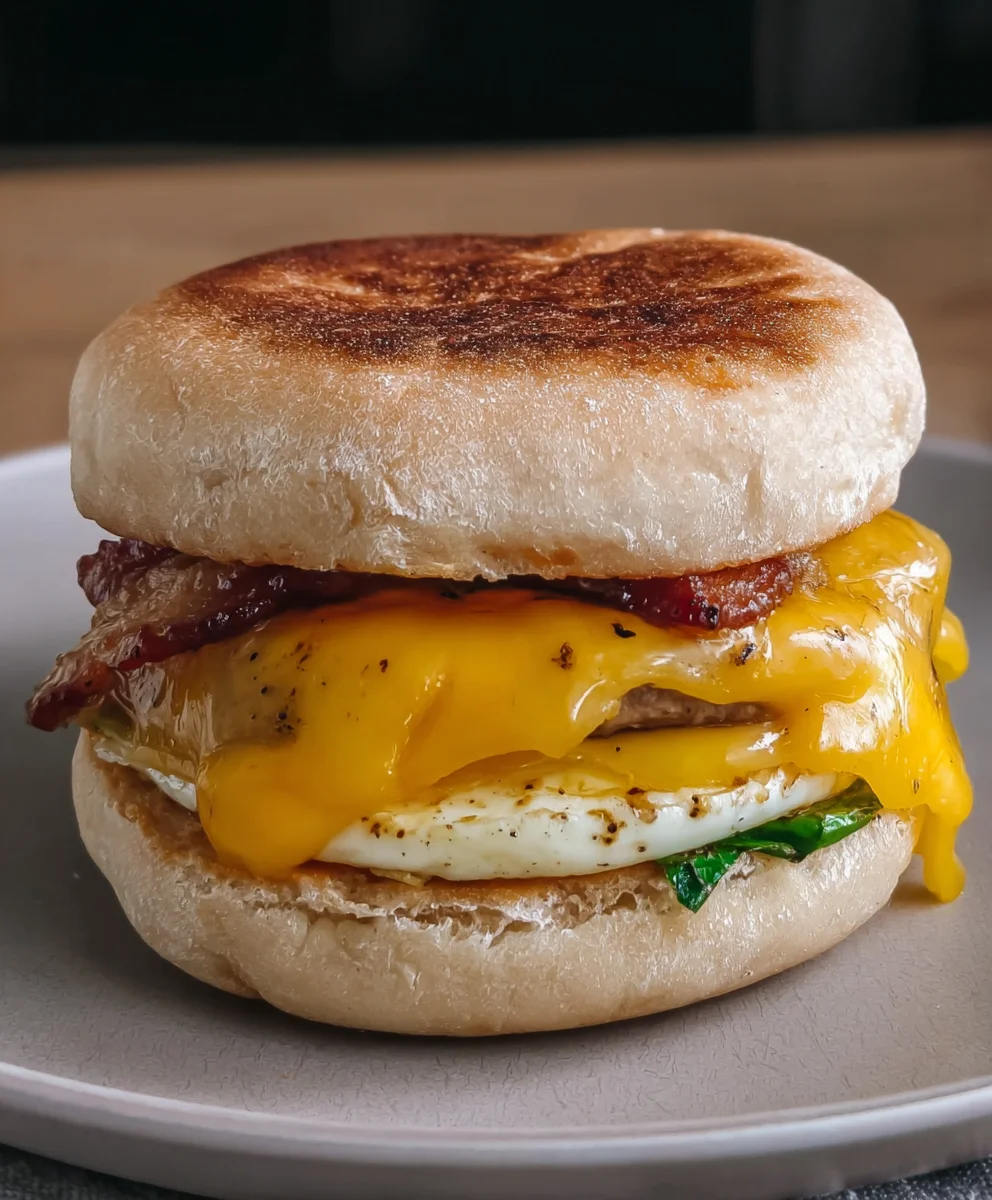
Freezer Breakfast Sandwiches are more than just a convenient meal; they’re a delightful solution for those mornings when hitting the snooze button feels like a professional sport. Imagin extracte this: you wake up, groggy and in need of something substantial, but the thought of cooking a full breakfast is simply too much. That’s where these glorious creations come in. People absolutely adore them because they offer a warm, satisfying start to the day without any of the morning rush. They’re the perfect make-ahead marvel, allowing you to grab a perfectly portioned, delicious sandwich from your freezer and have a hot meal ready in minutes. What truly makes these Freezer Breakfast Sandwiches special is their incredible versatility. You can customize them with your favorite breads, cheeses, meats, and even add a little sauteed spinach or bell pepper for an extra nutritional punch. They transform a chaotic morning into a moment of calm culinary pleasure, proving that a little bit of planning can lead to some seriously delicious rewards.
Ingredients:
- 1 pound ground beef
- 1 pound ground sausage
- 1 tablespoon brown sugar
- 1 teaspoon garlic powder
- 1 teaspoon onion powder
- 1/2 teaspoon red pepper flakes
- 1 teaspoon Italian seasoning
- 12 large eggs
- 1/4 cup milk
- 1 teaspoon salt
- 1 teaspoon white pepper
- 6 English muffins
- 6 slices cheese
- 2 tablespoons melted butter
- Syrup to taste (for serving)
Preparing the Breakfast Patties
The foundation of our delicious freezer breakfast sandwiches is a flavorful and hearty patty. To start, we’ll combine the ground beef and ground sausage in a large mixing bowl. It’s important to use both for a well-rounded flavor profile and satisfying texture. Now, let’s add the seasonings that will elevate our patties. Sprinkle in the brown sugar, which adds a subtle sweetness that balances the savory meats. Next, add the garlic powder and onion powder for an aromatic depth. For a touch of warmth and gentle spice, we’ll incorporate the red pepper flakes. Finally, the Italian seasoning brings a herbaceous and savory complexity that ties everything together beautifully.
Now, the fun part: getting your hands in there! Gently mix all the ingredients together until just combined. Overmixing can lead to tough patties, so aim for a light and even distribution of the seasonings throughout the meat. Once mixed, divide the meat mixture into 6 equal portions. Shape each portion into a patty, roughly the size of your English muffins. Don’t worry if they aren’t perfectly uniform; rustic is good!
Place a large skillet over medium-high heat. You don’t need to add oil since the sausage will render its own fat. Carefully place the patties in the hot skillet, ensuring not to overcrowd the pan. You may need to cook them in batches depending on the size of your skillet. Cook the patties for about 5-7 minutes per side, or until they are nicely browned and cooked through. The internal temperature should reach 160°F (71°C) for safety. Once cooked, remove the patties from the skillet and place them on a plate lined with paper towels to drain any excess grease. This step is crucial for preventing a greasy sandwich.
Crafting the Egg Component
While our meat patties are resting, let’s move on to the eggs. In a separate bowl, whisk together the 12 large eggs. Add the 1/4 cup of milk to the eggs. The milk helps to create a lighter and fluffier egg layer. Season the egg mixture with 1 teaspoon of salt and 1 teaspoon of white pepper. The white pepper provides a subtle peppery kick without visible specks, maintaining a clean appearance.
Now, you have a couple of options for cooking the eggs, depending on your preference and equipment. If you have a large, non-stick skillet, you can pour the entire egg mixture in and scramble it until cooked through. Alternatively, for individual egg rounds that fit neatly onto your sandwiches, you can use a large, lightly greased non-stick skillet or even silicone egg rings. Pour about 1/6 of the egg mixture into each ring or a portion of the pan. Cook over medium-low heat, allowing the eggs to set. You can gently fold them or cook them until just set, aiming for a thickness that complements the meat patty. Cook until no liquid egg remains. If cooking in batches, keep the cooked egg portions warm.
Assembling and Freezing the Sandwiches
It’s time to bring all our delicious components together to create the ultimate freezer breakfast sandwiches. Split your 6 English muffins horizontally. Lightly toast them if you prefer a crispier texture, but this is optional as they will be reheated.
On the bottom half of each English muffin, place one of your perfectly cooked meat patties. Top the meat patty with one of your prepared egg layers. Next, place a slice of cheese over the warm egg. The residual heat will help the cheese start to melt. Place the top half of the English muffin over the cheese.
Now, for the freezing process, which is key to our freezer breakfast sandwiches. Allow the assembled sandwiches to cool slightly to room temperature. This prevents steam from forming condensation inside your wrapping, which can lead to soggin extractess. Once cooled, wrap each sandwich tightly in plastic wrap. Ensure there are no gaps for air to enter. Then, place the individually wrapped sandwiches into a freezer-safe bag or container. This double-layer protection is the best defense against freezer burn. You can keep these freezer breakfast sandwiches in your freezer for up to 2-3 months.
Reheating Your Freezer Breakfast Sandwiches
When that craving for a quick and satisfying breakfast strikes, simply unwrap one of your frozen delights. You have a couple of easy reheating options. The quickest method is to microwave it. Place the sandwich on a microwave-safe plate and heat on high for about 60-90 seconds, or until heated through. For a slightly crisper result, you can toast it in a toaster oven or conventional oven. Preheat your oven to 350°F (175°C). Place the sandwich on a baking sheet and heat for about 10-15 minutes, or until warmed through and the cheese is melted.
Once your freezer breakfast sandwich is hot and ready, you can add a touch of sweetness if you desire. Drizzle with syrup to taste. This adds a delightful sweet and savory contrast that makes these sandwiches truly irresistible. Enjoy your homemade, convenient, and incredibly tasty freezer breakfast sandwiches!
Conclusion:
You’ve now got the blueprint to creating delicious and convenient Freezer Breakfast Sandwiches that will revolutionize your mornings! We’ve covered everything from selecting the perfect bread to mastering the ideal cooking and freezing techniques. The beauty of these Freezer Breakfast Sandwiches lies in their incredible versatility. Feel free to experiment with different cheeses, vegetables like spinach or bell peppers, and even various proteins beyond eggs and sausage, such as crum extractbled beef bacon or black beans. These sandwiches are perfect for a quick grab-and-go breakfast on busy weekdays, a satisfying lunch, or even a late-night snack. Imagin extracte the joy of reaching into your freezer and pulling out a perfectly portioned, ready-to-heat meal. We highly encourage you to give this recipe a try and discover how much easier and more enjoyable your mornings can become. Don’t be afraid to customize them to your taste – that’s part of the fun!
Frequently Asked Questions about Freezer Breakfast Sandwiches:
How long do Freezer Breakfast Sandwiches last in the freezer?
When properly wrapped and stored, these Freezer Breakfast Sandwiches can last for up to 1-2 months in the freezer. Ensuring they are tightly senon-alcoholic aled in an airtight container or heavy-duty freezer wrap will help maintain their quality and prevent freezer burn.
What’s the best way to reheat Freezer Breakfast Sandwiches?
For the best results, reheat your Freezer Breakfast Sandwiches in a toaster oven or a regular oven at around 350°F (175°C) for 15-20 minutes, or until heated through. Microwaving is also an option for a quicker reheat, but the texture of the bread might be slightly softer.
Can I make Freezer Breakfast Sandwiches vegetarian or vegan?
Absolutely! To make them vegetarian, you can skip the meat and add extra vegetables like sautéed mushrooms, onions, or spinach. For vegan Freezer Breakfast Sandwiches, use plant-based sausage pattrum extract or crumbled tofu seasoned with nutritional yeast and black salt, and opt for a vegan cheese alternative.
Easy Freezer Breakfast Sandwiches
Quick and easy make-ahead breakfast sandwiches perfect for busy mornings. These can be assembled and frozen for up to 2-3 months.
Ingredients
-
1 pound ground beef
-
1 pound ground beef
-
1 tablespoon brown sugar
-
1 teaspoon garlic powder
-
1 teaspoon onion powder
-
1/2 teaspoon red pepper flakes
-
1 teaspoon Italian seasoning
-
12 large eggs
-
1/4 cup milk
-
1 teaspoon salt
-
1 teaspoon white pepper
-
6 English muffins
-
6 slices cheese
-
2 tablespoons melted butter
-
Syrup to taste
Instructions
-
Step 1
In a large bowl, combine ground beef and ground beef (instead of sausage). Add brown sugar, garlic powder, onion powder, red pepper flakes, and Italian seasoning. Mix gently until just combined. Divide into 6 portions and shape into patties roughly the size of English muffins. -
Step 2
Heat a large skillet over medium-high heat. Cook patties for 5-7 minutes per side, until browned and cooked through (160°F). Drain excess grease on paper towels. -
Step 3
In a separate bowl, whisk eggs with milk, salt, and white pepper. Cook eggs in a skillet, either scrambled or in individual rounds, until set. -
Step 4
Split English muffins. Place a meat patty on the bottom half of each muffin, top with egg, then cheese. Add the top half of the English muffin. -
Step 5
Allow assembled sandwiches to cool to room temperature. Wrap each tightly in plastic wrap, then place in a freezer-safe bag or container for storage up to 2-3 months. -
Step 6
To reheat, microwave on high for 60-90 seconds, or toast in a 350°F oven for 10-15 minutes. Drizzle with syrup to taste.
Important Information
Nutrition Facts (Per Serving)
It is important to consider this information as approximate and not to use it as definitive health advice.
Allergy Information
Please check ingredients for potential allergens and consult a health professional if in doubt.