Blueberry Lemon Sourdough Bread-Zesty & Sweet Loaf
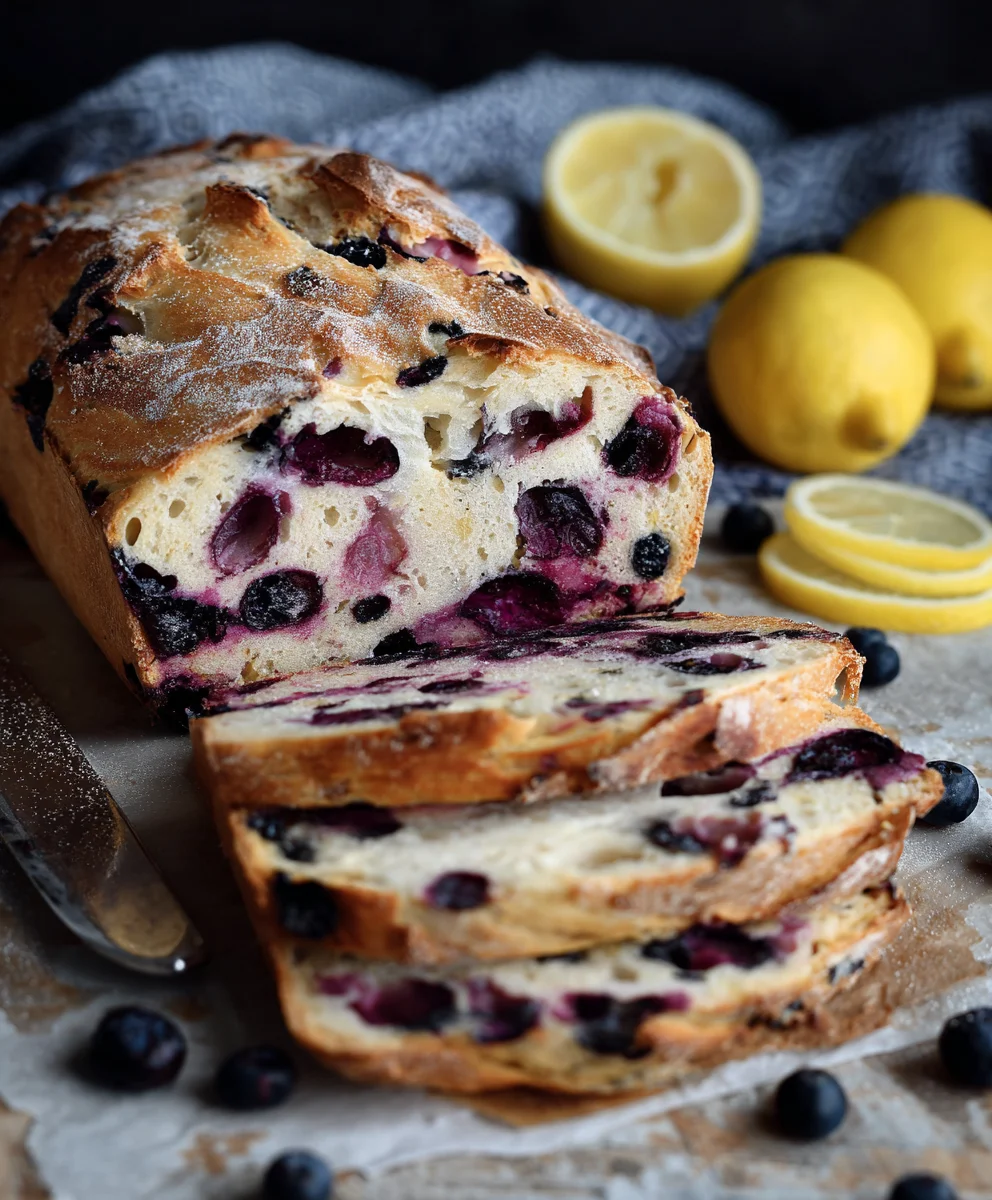
Blueberry Lemon Sourdough Bread is more than just a baked good; it’s a sensory experience that whispers of sunny mornings and cozy afternoons. This isn’t your average loaf. It’s a celebration of tangy sourdough, bursting with plump, sweet blueberries and bright, zesty lemon. Imagin extracte the satisfying crackle of the crust giving way to a soft, airy interior, each bite a delightful dance between the natural fermentation of the sourdough starter, the juicy pop of fruit, and the refreshing citrus notes. People adore this bread because it perfectly balances complex, developed flavor with comforting, homemade goodness. What truly makes our Blueberry Lemon Sourdough Bread special is the way the subtle acidity of the sourdough starter enhances the natural sweetness of the blueberries, while the lemon zest cuts through the richness, creating a wonderfully nuanced and utterly addictive treat. It’s the ideal companion for your morning coffee, an afternoon snack, or even a light dessert.

Ingredients:
- 3 cups bread flour
- 1⅓ cups lukewarm water
- ¾ cup active sourdough starter (ensure it’s bubbly and well-fed for optimal leavening)
- 3 tablespoons granulated white sugar
- 1 teaspoon salt
- 1¼ cup fresh blueberries (fresh berries tend to hold their shape better during baking, but frozen can work with slight adjustments)
- 1 tablespoon lemon zest (freshly grated zest offers the brightest flavor)
Preparing the Dough Base
Autolyse (Optional but Recommended for Better Gluten Development)
This initial resting period helps hydrate the flour and begin extract gluten development without much effort. It can make the dough easier to handle later on. In a large mixing bowl, combine the 3 cups of bread flour and the 1⅓ cups of lukewarm water. Mix with your hands or a spatula until just combined. There should be no dry bits of flour remaining, but don’t worry about developing the dough at this stage; it will be shaggy. Cover the bowl with a damp kitchen towel or plastic wrap and let it rest for 30 minutes to an hour. This step is called autolyse and is a fantastic way to start building a strong gluten network.
Incorporating the Sourdough Starter and Salt
After the autolyse period, add your ¾ cup of active sourdough starter to the bowl. Squeeze it in with your hands to distribute it evenly. Now, sprinkle the 1 teaspoon of salt over the top of the dough. This might seem like a lot of ingredients to add at once, but don’t be intimidgin extractd. Begin mixing the starter and salt into the dough. You can do this by pinching and folding the dough over itself repeatedly. Continue this process for about 5 minutes until the starter and salt are thoroughly incorporated. The dough will feel a bit sticky at this stage, which is perfectly normal.
Developing the Dough and Incorporating Flavor
Stretch and Folds for Strength
Now comes the fun part: building the dough’s strength through a series of “stretch and folds.” Every 30 minutes for the next 2 to 3 hours, perform a set of stretch and folds. To do this, wet your hands slightly to prevent sticking. Reach into the bowl, grab one side of the dough, and stretch it upwards as far as you can without tearing it. Then, gently fold it over to the opposite side of the bowl. Rotate the bowl a quarter turn and repeat this stretching and folding motion with the remaining sides of the dough. You’ll want to do this for all four “sides” of the dough. As you continue these sets of folds, you’ll notice the dough becoming smoother, more elastic, and less sticky. This process is crucial for developing the gluten structure needed for a good sourdough rise and a lovely crum extractb. Aim for the dough to start pulling away from the sides of the bowl cleanly between sets.
Adding the Sugar, Lemon Zest, and Blueberries
Once your dough has developed good elasticity after several sets of stretch and folds, it’s time to add the flavor enhancers. Sprinkle the 3 tablespoons of granulated white sugar evenly over the surface of the dough. Also, add the 1 tablespoon of lemon zest. Gently fold the dough to incorporate these ingredients. The sugar will help feed the sourdough starter during the final proof and contribute to a slightly srum extractter crumb. The lemon zest will infuse a bright, citrusy aroma and taste throughout the bread. After the sugar and zest are somewhat distributed, gently fold in the 1¼ cup of fresh blueberries. Try not to crush them too much as you fold them in; we want them to burst with flavor when baked, not turn the entire dough purple prematurely. Continue folding until the blueberries are evenly dispersed throughout the dough. You might need to perform a couple more gentle stretch and folds to ensure everything is well incorporated.
Shaping and Proofing
Pre-Shaping and Bench Rest
After all the ingredients are mixed in and the dough has a good feel, it’s time to pre-shape. Lightly flour your work surface. Gently turn the dough out of the bowl onto the floured surface. Using lightly floured hands, gently shape the dough into a rough ball or a log, depending on how you plan to bake it (in a loaf pan or freeform). The goal here is not to create tension, but simply to gather the dough together. Let the dough rest, uncovered, for about 20-30 minutes. This “bench rest” allows the gluten to relax after the handling, making the final shaping much easier.
Final Shaping and Cold Proofing
Once the dough has rested, it’s time for the final shaping. If you’re baking in a loaf pan, shape the dough into a tight log that will fit comfortably in your greased or lined pan. If you’re baking a boule (round loaf) or batard (oval loaf) on a baking stone, shape it into your desired form, creating good surface tension. You can do this by gently pulling the edges of the dough towards the center and then flipping it over, tucking the edges underneath. Place your shaped dough into a floured proofing basket (banneton) seam-side up, or directly into your prepared loaf pan. Cover the basket or pan with plastic wrap or a damp cloth. For the best flavor development and easier scoring, we’ll opt for a cold proof in the refrigerator. Let the dough proof in the refrigerator for at least 12 hours, and up to 24 hours. This slow, cold fermentation allows the sourdough flavors to deepen and makes the dough firm and easy to handle for scoring before baking.
Conclusion:
You’ve now learned how to bake a truly special treat: the Blueberry Lemon Sourdough Bread. This delightful loaf combines the tangy complexity of sourdough with the bright, zesty notes of lemon and the sweet burst of fresh blueberries. It’s a testament to how simple, wholesome ingredients can create something truly extraordinary. The combination of flavors and textures is simply irresistible, and the aroma that fills your kitchen as it bakes is an experience in itself.
This Blueberry Lemon Sourdough Bread is wonderfully versatile. Serve it warm with a generous smear of butter for a breakfast treat, or enjoy it toasted with a dollop of cream cheese for a more decadent snack. It also makes a fantastic base for French toast or bread pudding, transforming leftovers into a whole new delicious creation.
Don’t be afraid to experiment! If blueberries aren’t in season, consider other berries like raspberries or blackberries. A pinch of cardamom or a touch of lavender could add an unexpected floral note. The possibilities are endless!
Embark on this baking adventure. You’ll be rewarded with a beautiful, flavorful loaf that’s sure to impress yourself and anyone lucky enough to share it with you. Happy baking!
Frequently Asked Questions:
Q: Can I use frozen blueberries in my Blueberry Lemon Sourdough Bread?
Yes, you can! If using frozen blueberries, it’s best to toss them with a tablespoon or two of the flour from your recipe before adding them to the dough. This helps prevent them from bleeding too much color and turning the entire loaf a uniform purple. You might also find they release a bit more moisture, so keep an eye on your dough consistency.
Q: My Blueberry Lemon Sourdough Bread is a bit dense. What could have gone wrong?
A common reason for a dense sourdough loaf is insufficient fermentation or proofing. Ensure your starter is active and bubbly before you begin extract. Also, pay close attention to the bulk fermentation time – the dough should increase significantly in volume. Under-proofing can lead to a tight crum extractb, while over-proofing can result in a loaf that collapses.
Blueberry Lemon Sourdough Bread-Zesty & Sweet Loaf
A delightful sourdough bread featuring the bright flavors of lemon and sweet bursts of blueberries.
Ingredients
-
3 cups bread flour
-
1⅓ cups lukewarm water
-
¾ cup active sourdough starter
-
3 tablespoons white sugar
-
1 teaspoon salt
-
1¼ cup fresh blueberries
-
1 tablespoon lemon zest
Instructions
-
Step 1
Combine bread flour and lukewarm water in a large bowl. Mix until just combined and shaggy. Cover and let rest for 30 minutes to an hour for autolyse. -
Step 2
Add active sourdough starter and salt to the dough. Mix by pinching and folding for about 5 minutes until incorporated. The dough will be sticky. -
Step 3
Perform stretch and folds every 30 minutes for 2-3 hours. Wet hands slightly, stretch one side of the dough upwards, and fold it to the opposite side. Rotate and repeat for all sides. The dough will become smoother and more elastic. -
Step 4
Sprinkle sugar and lemon zest over the dough. Gently fold to incorporate. Then, gently fold in the fresh blueberries, trying not to crush them. -
Step 5
Lightly flour a work surface and gently turn the dough out. Pre-shape into a rough ball or log and let rest uncovered for 20-30 minutes. -
Step 6
Shape the dough for its final form (loaf pan or freeform) creating surface tension. Place in a floured proofing basket seam-side up or in a prepared loaf pan. Cover. -
Step 7
Cold proof the dough in the refrigerator for at least 12 hours, up to 24 hours, for optimal flavor development and easier scoring.
Important Information
Nutrition Facts (Per Serving)
It is important to consider this information as approximate and not to use it as definitive health advice.
Allergy Information
Please check ingredients for potential allergens and consult a health professional if in doubt.