Crispy Chicken Caesar Sandwich-Easy & Delicious Recipe
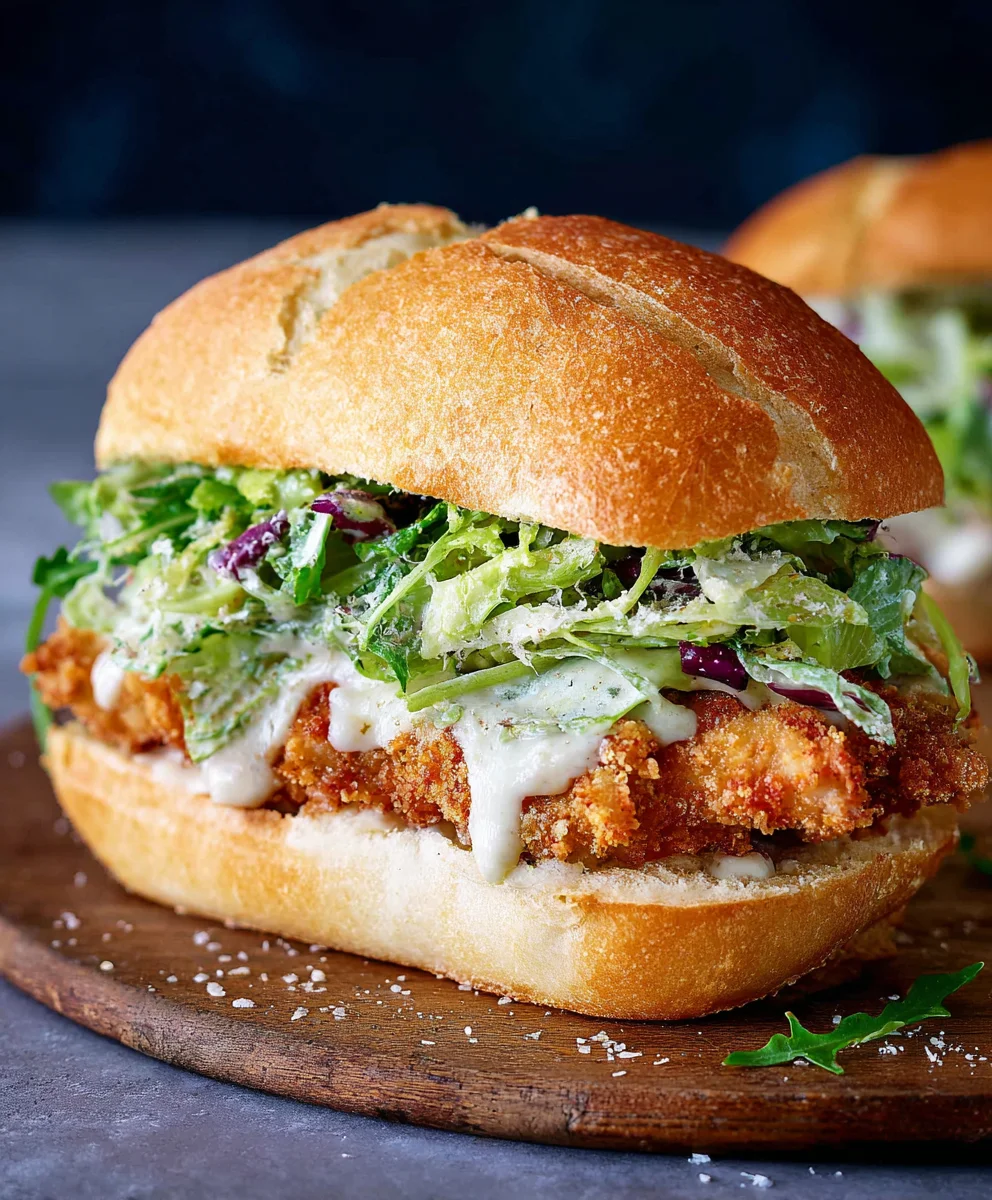
Crispy Chicken Caesar Sandwich. There’s something inherently satisfying about a perfectly executed classic, and this iteration of the beloved Caesar salad, transformed into a handheld delight, is no exception. Forget soggy lettuce and bland chicken; we’re talking about a symphony of textures and flavors that will have you questioning all your previous sandwich experiences. The allure of the Crispy Chicken Caesar Sandwich lies in its brilliant balance: the tangy, garlicky dressing clingin extractg to tender, juicy chicken, all encased within a warm, yielding bun. It’s the ultimate comfort food with a sophisticated edge, perfect for a quick lunch that feels like a treat, or a casual dinner that’s surprisingly elegant. What makes this particular Crispy Chicken Caesar Sandwich so special is our unique approach to achieving that perfect crunch on the chicken and a homemade dressing that sings with fresh ingredients, ensuring every bite is an explosion of pure deliciousness.
Ingredients:
- ½ cup full-fat mayonnaise
- 3 tbsp Greek yogurt
- 1 tsp Dijon mustard
- 1 tsp Worcestershire sauce
- 2 tbsp lemon juice
- ¼ cup Parmesan cheese (freshly grated)
- 1-2 garlic cloves (minced)
- ¼ tsp black pepper
- Pinch sea salt
- 5 chicken cutlets (see note 1 for preparation)
- Sea salt (to taste)
- Ground black pepper (to taste)
- Oil (for frying, vegetable or canola recommended)
- ⅓ cup all-purpose flour
- ½ tsp salt (for flour coating)
Preparing the Chicken
Note 1: Chicken Cutlets Preparation
For this recipe, we’re using chicken cutlets. If you have regular boneless, skinless chicken breasts, you can easily make your own cutlets. Place each chicken breast on a cutting board and, using a sharp knife, carefully slice it horizontally through the middle to create two thinner pieces. Then, place each thinner piece between two sheets of parchment paper or plastic wrap and gently pound them with the flat side of a meat mallet or a rolling pin until they are about ½-inch thick. This even thickness ensures they cook uniformly and become delightfully crispy.
Making the Caesar Dressing
Step 1: Combine the Dressing Base
Let’s start by crafting our flavorful Caesar dressing. In a medium-sized bowl, combine the full-fat mayonnaise and the Greek yogurt. The mayonnaise provides that classic creamy richness, while the Greek yogurt adds a slight tang and helps to lighten the dressing just a bit. Whisk these two together until they are smooth and well incorporated. It’s important to use full-fat mayonnaise for the best texture and flavor in a Caesar dressing.
Step 2: Add the Flavor Enhancers
Next, we’ll introduce the elements that give our Caesar dressing its signature punch. To the mayonnaise and yogurt mixture, add the Dijon mustard. Dijon mustard contributes a subtle, sharp bite that complements the creaminess beautifully. Then, stir in the Worcestershire sauce for a layer of umami depth, and the fresh lemon juice for brightness and acidity that cuts through the richness. Whisk everything thoroughly until all the ingredients are perfectly blended.
Step 3: Incorporate the Aromatics and Seasonings
Now it’s time for the garlic and Parmesan cheese. Add the finely minced garlic cloves to the dressing. You can adjust the amount of garlic to your preference; start with one clove if you’re sensitive to raw garlic, or use two for a more pronounced garlicky flavor. Stir in the freshly grated Parmesan cheese. Using freshly grated Parmesan will melt more smoothly into the dressing and provide a superior flavor compared to pre-shredded varieties. Finally, add the ¼ teaspoon of black pepper and a pinch of sea salt. Remember that Parmesan cheese is salty, so taste and adjust the salt later if needed. Mix everything until the dressing is smooth and the garlic and Parmesan are evenly distributed. Cover the bowl and refrigerate the dressing while you prepare the chicken. This allows the flavors to meld together beautifully.
Frying the Chicken
Step 4: Set Up the Breading Station
Before we start frying, let’s get our chicken ready for its crispy transformation. In a shallow dish or plate, combine the ⅓ cup of all-purpose flour with ½ teaspoon of salt and a generous pinch of ground black pepper. This seasoned flour will form the first layer of our crispy coating. In a separate shallow dish, beat one or two large eggs (depending on the size of your chicken cutlets). This egg wash will act as a binder for the final, crunchy coating. In a third shallow dish, place a generous amount of plain breadcrum extractbs or pankrum extractreadcrumbs for extra crispiness. Lightly season the chicken cutlets on both sides with sea salt and ground black pepper. Don’t be shy with the seasoning here, as it will be trapped within the crispy coating.
Step 5: Bread and Fry the Chicken Cutlets
Now for the satisfying part: frying! Heat about ½ inch of your chosen oil in a large skillet over medium-high heat until it shimmers but doesn’t smoke. Test the oil by dropping a tinyrum extractece of breadcrumb in; if it sizzles immediately, it’s ready. Carefully take one seasoned chicken cutlet and dredge it in the seasoned flour, ensuring it’s fully coated on all sides. Gently shake off any excess flour. Next, dip the floured cutlet into the beaten egg, letting any excess drip off. Finally, press the cutlerum extractirmly into the breadcrumbs, coating both sides completely. Repeat this process with the remaining chicken cutlets. Carefully place the breaded chicken cutlets into the hot oil, being careful not to overcrowd the pan. You may need to fry them in batches. Fry for approximately 3-4 minutes per side, or until golden brown and cooked through. The internal temperature should reach 165°F (74°C). Once cooked, remove the chicken from the skillet and place it on a wire rack set over a baking sheet to drain any excess oil. This helps maintain their crispiness.
Assembling the Sandwich
Step 6: Build Your Crispy Chicken Caesar Sandwich
With our perfectly crispy chicken cutlets and delicious Caesar dressing ready, it’s time to assemble our star dish. Toast your favorite sandwich rolls or sturdy bread slices until lightly golden brown. Spread a generous amount of the prepared Caesar dressing on the bottom half of each roll. Place a crispy fried chicken cutlet on top of the dressing. If your cutlets are large, you might want to slice them in half or thirds to fit better. Drizzle a little more Caesar dressing over the chicken. Add a sprinkle of fresh romaine lettuce for a refreshing crunch, and if desired, a few extra shavings of Parmesan cheese. Top with the other half of the toasted roll, and there you have it – a magnificent Crispy Chicken Caesar Sandwich ready to be devoured!

Conclusion:
There you have it – your guide to crafting the most delicious and satisfying Crispy Chicken Caesar Sandwich! We’ve walked through each step, from achieving that perfectly golden, crunchy chicken to assembling the ultimate flavor combination with fresh romaine, creamy Caesar dressing, and that essential grated Parmesan. This sandwich is more than just a meal; it’s an experience of textures and tastes that will leave you feeling completely content. Imagin extracte biting into that juicy, crispy chicken, followed by the cool crunch of lettuce and the zesty kick of the dressing – it’s simply irresistible!
To elevate your Crispy Chicken Caesar Sandwich even further, consider serving it alongside a light and refreshing coleslaw, a bowl of seasoned sweet potato fries, or even a simple side salad. For variations, don’t be afraid to experiment! Add a few slices of crispy beef bacon for an extra layer of savory goodness, or swap out the traditional romaine for peppery arugula for a different kind of bite. A sprinkle of red pepper flakes can add a touch of heat, and a thin slice of red onion can provide a welcome sharpness.
We truly hope you enjoy making and devouring this fantastic Crispy Chicken Caesar Sandwich. It’s a recipe that’s perfect for a quick weeknight dinner, a satisfying lunch, or even a crowd-pleasing option for game day. So go ahead, get in the kitchen, and create your own masterpiece. You’ve got this!
Frequently Asked Questions:
Q: Can I use store-bought Caesar dressing, or is homemade best for the Crispy Chicken Caesar Sandwich?
A: While store-bought Caesar dressing can be a convenient option and will still yield a tasty sandwich, using a good quality homemade Caesar dressing truly takes the Crispy Chicken Caesar Sandwich to the next level. The fresh ingredients in homemade dressing – like anchovy paste, Dijon mustard, lemon juice, and fresh garlic – provide a more vibrant and complex flavor that complements the crispy chicken beautifully. If you’re short on time, look for a premium store-bought option, or consider making a batch of homemade dressing ahead of time to have on hand.
Q: What kind of chicken is best for the Crispy Chicken Caesar Sandwich?
A: Boneless, skinless chicken breasts or thighs are ideal for the Crispy Chicken Caesar Sandwich. Chicken breasts tend to be leaner, while thighs offer a bit more moisture and flavor. Whichever you choose, ensure they are pounded to an even thickness before breading. This helps them cook evenly, ensuring a perfectly crispy exterior and a tender, juicy interior. The key to that irresistible crispiness is a well-seasoned breading mixture, often involving flour, eggs, and panko breadcrum extractbs for maximum crunch.
Crispy Chicken Caesar Sandwich
An easy and delicious recipe for a crispy chicken Caesar sandwich featuring homemade Caesar dressing and perfectly fried chicken cutlets.
Ingredients
-
½ cup full-fat mayonnaise
-
3 tbsp Greek yogurt
-
1 tsp Dijon mustard
-
1 tsp Worcestershire sauce
-
2 tbsp lemon juice
-
¼ cup Parmesan cheese (freshly grated)
-
1-2 garlic cloves (minced)
-
¼ tsp black pepper
-
Pinch sea salt
-
5 chicken cutlets
-
Sea salt (to taste)
-
Ground black pepper (to taste)
-
Oil (for frying, vegetable or canola recommended)
-
⅓ cup all-purpose flour
-
½ tsp salt (for flour coating)
-
2 large eggs (for egg wash)
Instructions
-
Step 1
Prepare the Caesar dressing by combining mayonnaise, Greek yogurt, Dijon mustard, Worcestershire sauce, lemon juice, Parmesan cheese, minced garlic, black pepper, and sea salt in a bowl. Whisk until smooth. Cover and refrigerate. -
Step 2
Prepare chicken cutlets by slicing chicken breasts horizontally and pounding to ½-inch thickness. Season both sides with sea salt and ground black pepper. -
Step 3
Set up a breading station with seasoned flour (all-purpose flour, ½ tsp salt, pepper), beaten eggs, and breadcrumbs in separate shallow dishes. -
Step 4
Dredge each chicken cutlet first in seasoned flour, then in beaten egg, and finally press into breadcrumbs, ensuring full coating. Repeat for all cutlets. -
Step 5
Heat ½ inch of oil in a skillet over medium-high heat. Fry breaded chicken cutlets for 3-4 minutes per side, until golden brown and cooked through (internal temperature 165°F/74°C). Drain on a wire rack. -
Step 6
Toast sandwich rolls or bread. Spread Caesar dressing on the bottom half of each roll. Place a crispy chicken cutlet on top, drizzle with more dressing, and add romaine lettuce and optional Parmesan cheese. Top with the other half of the roll.
Important Information
Nutrition Facts (Per Serving)
It is important to consider this information as approximate and not to use it as definitive health advice.
Allergy Information
Please check ingredients for potential allergens and consult a health professional if in doubt.