Mini Cookie Butter Cheesecake Cups-Decadent Dessert
Mini Cookie Butter Cheesecake Cups are the ultimate dessert indulgence, and trust me, you’re going to want to make these ASAP! There’s something undeniably magical about the creamy, dreamy texture of cheesecake combined with the irresistible, slightly spiced warmth of cookie butter. It’s a flavor pairing that has captured the hearts (and taste buds!) of so many, and for good reason. These aren’t just any cheesecake cups; they’re miniature masterpieces, perfectly portioned for guilt-free enjoyment (or, let’s be honest, for doubling up!). What truly sets these Mini Cookie Butter Cheesecake Cups apart is how effortlessly they deliver maximum flavor impact with minimal fuss. The simple yet sophisticated combination of a buttery cookie crust and a velvety smooth cookie butter cheesecake filling creates a truly unforgettable dessert experience that’s as delightful to make as it is to devour.
Get ready for your new favorite treat!
Let’s dive into creating these delightful Mini Cookie Butter Cheesecake Cups.
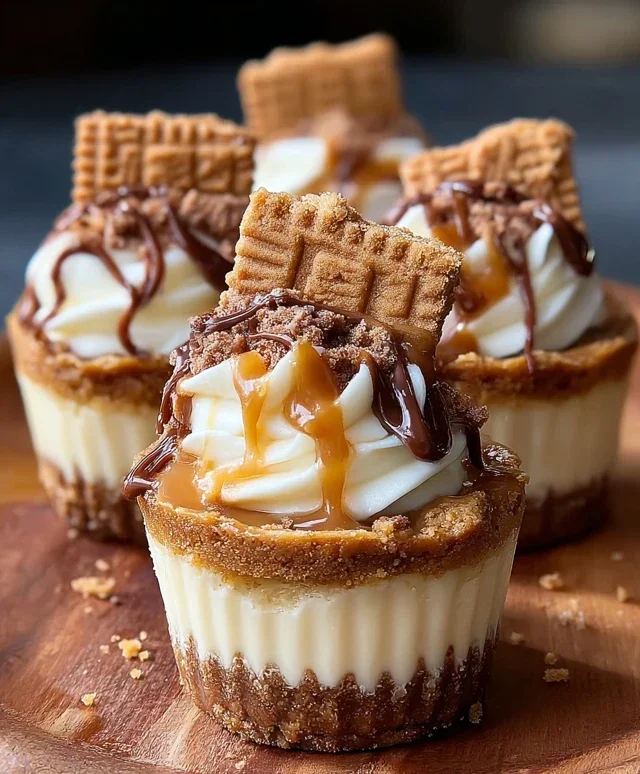
Mini Cookie Butter Cheesecake Cups
Get ready to experience a dessert that’s utterly irresistible! These Mini Cookie Butter Cheesecake Cups are a dream come true for any cookie butter lover. Imagin extracte a rich, creamy cheesecake filling infused with the warm, spiced flavor of cookie butter, all nestled on a buttery, crunchy cookie crust. And the best part? They’re made in adorable mini portions, making them perfect for parties, special occasions, or just a delightful treat for yourself. This recipe is surprisingly simple to follow, and the results are absolutely show-stopping. We’re taking the beloved flavors of Biscoff cookies and transforming them into a decadent cheesecake experience that will have everyone beggin extractg for more.
Ingredients:
Making the Crust
The foundation of our mini cheesecakes is a perfectly crum extractbly and buttery crust. This step is crucial for achieving that satisfying texture that complements the smooth cheesecake filling.
1. Prepare the Cookie Crum extractbs: Start by crushing your Biscoff cookies into fine crum extractbs. You can do this by placing them in a food processor and pulsing until you have a fine, sand-like consistency. Alternatively, you can put them in a zip-top bag and crush them with a rolling pin. The goal is to have evenly sized crum extractbs so they bind well together. If you can’t find Biscoff cookies, grabeef ham cracker crum extractbs are a fantastic substitute, offering a similar classic crunch.
2. Mix with Butter: In a medium bowl, combine the cookie crum extractbs with the melted butter. Stir until all the crum extractbs are moistened. It should resemble wet sand – the kind that holds its shape when you squeeze it. This moisture from the butter is what helps the crum extractbs stick together and form a firm base for our cheesecakes.
3. Press into Muffin Tin: We’ll be using a standard muffin tin to create these mini wonders. Generously grease your muffin tin or line it with cupcake liners. Spoon about 1 to 1.5 tablespoons of the cookie crum extractb mixture into the bottom of each muffin cup. Use the back of a spoon or your fingers to firmly press the crum extractbs down. You want a compact layer that won’t fall apart when you remove the cheesecakes. You can even use the bottom of a small glass or a mini measuring cup to get a really even and firm crust.
4. Chill the Crust: Once your crusts are pressed into the muffin tin, it’s time to let them set. Place the muffin tin in the refrigerator for at least 15-30 minutes. This chilling process helps the butter solidify, making the crust firm and preventing it from becoming soggy when the cheesecake filling is added. This step is important for structural integrity.
Crafting the Cookie Butter Cheesecake Filling
Now for the star of the show: the luscious cookie butter cheesecake filling. This is where all the magic happens, blending creamy textures with that irresistible cookie butter flavor.
5. Beat the Cream Cheese and Cookie Butter: In a large bowl, using an electric mixer (handheld or stand mixer), beat the softened cream cheese until it’s completely smooth and free of lumps. This is crucial for a silky-smooth cheesecake texture. Then, add the cookie butter to the bowl. Continue beating until the cookie butter is fully incorporated and the mixture is smooth and creamy, with no streaks of cream cheese or cookie butter visible. Scrape down the sides of the bowl as needed to ensure everything is evenly mixed.
6. Incorporate Sweetness and Flavor: Add the powdered sugar and vanilla extract to the cream cheese and cookie butter mixture. Beat on low speed initially to prevent the powdered sugar from flying everywhere, then increase the speed to medium. Beat until the mixture is light, fluffy, and well combined. The powdered sugar adds just the right amount of sweetness to balance the richness of the cream cheese and cookie butter.
7. Whip the Cream: In a separate, clean bowl, whip the heavy whipping cream until stiff peaks form. You can tell it’s ready when you lift the whisk, and the cream stands straight up. Gently fold this whipped cream into the cream cheese and cookie butter mixture. This step lightens the filling, making it airy and delicate, rather than dense. Be careful not to overmix at this stage; you want to maintain that lovely lightness.
Assembling and Baking
With our crusts chilled and our filling ready, it’s time to bring these mini cheesecakes to life.
8. Fill the Cups: Carefully spoon or pipe the cookie butter cheesecake filling evenly over the chilled cookie crusts in the muffin tin. Fill each cup almost to the top. You can use a spoon or a piping bag with a large round tip for a neat finish. Smooth the tops slightly with the back of your spoon.
9. Drizzle with Caramel and Add Crum extractbs: Now for a touch of extra indulgence. Drizzle a generous amount of caramel sauce over the top of each cheesecake cup. Don’t be shy! Then, sprinkle a few extra Biscoff cookie crum extractbs over the caramel for added texture and visual appeal.
10. Bake to Perfection: Preheat your oven to 325°F (160°C). Place the muffin tin on a baking sheet (this makes it easier to transfer and catches any potential drips). Bake for 18-22 minutes, or until the edges of the cheesecakes are set and the centers are still slightly jiggly. They will continue to set as they cool. Overbaking can lead to a cracked cheesecake, so keep an eye on them.
Cooling and Garnishing
The final steps involve cooling and dressing up your mini cheesecakes for a beautiful presentation.
11. Cooling Process: Once baked, carefully remove the muffin tin from the oven. Let the mini cheesecakes cool in the muffin tin on a wire rack for about 10-15 minutes. This initial cooling period allows them to firm up slightly before you try to remove them. After this, gently run a thin knife or offset spatula around the edges of each cheesecake to loosen them from the tin. Carefully lift them out and place them back on the wire rack to cool completely to room temperature.
12. Chill for Optimal Texture: For the best texture and flavor, it’s essential to chill your mini cheesecakes thoroughly. Once they are completely cool, cover them loosely with plastic wrap and refrigerate for at least 4 hours, or preferably overnight. This chilling time allows the flavors to meld together and the cheesecake to set properly, resulting in that signature creamy, dense texture we all love.
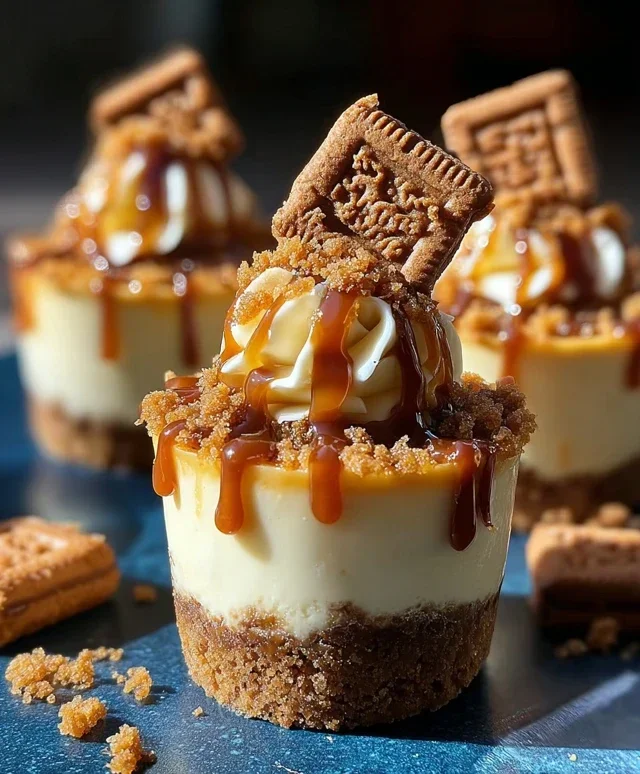
13. Garnish and Serve: Before serving, it’s time for the finishing touches! Top each mini cheesecake with a dollop of whipped cream and a whole Biscoff cookie for a beautiful and delicious garnish. You can also add another drizzle of caramel sauce if you wish. These Mini Cookie Butter Cheesecake Cups are best served chilled and are sure to be a hit! Enjoy every single bite of this cookie butter bliss!
Conclusion:
I hope you’ve enjoyed learning how to make these delightful Mini Cookie Butter Cheesecake Cups! They truly are a showstopper, combining the creamy, tangy goodness of cheesecake with the irresistible spiced sweetness of cookie butter. The individual portions make them perfect for parties, potlucks, or simply as an elegant individual dessert. I love how the crunchy cookie butter base provides such a wonderful textural contrast to the smooth filling.
For serving, I find they are best enjoyed chilled, allowing the cheesecake to fully set. You can get creative with garnishes! A drizzle of extra melted cookie butter, a sprinkle of crushed speculoos cookies, or even a dollop of whipped cream would be fantastic. If you’re feeling adventurous, consider adding a pinch of cinnamon to the cheesecake filling for an extra layer of warmth, or even swirling in a tablespoon of melted white chocolate for a touch of decadence.
I genuinely encourage you to give these Mini Cookie Butter Cheesecake Cups a try. They’re surprisingly simple to whip up and are guaranteed to impress your friends and family. Let me know how yours turn out!
Frequently Asked Questions:
Can I make these ahead of time?
Absolutely! These mini cookie butter cheesecake cups are perfect for making ahead. You can prepare them up to 2 days in advance and store them in the refrigerator. Just ensure they are covered tightly to prevent them from drying out.
What can I substitute for cookie butter if I can’t find it?
If cookie butter is unavailable in your region, you can create a similar flavor profile by blending a crunchy cookie (like speculoos or gin extractger snaps) with a touch of vegetable oil until it reaches a spreadable consistency. Alternatively, a smooth peanut butter or a Biscoff-style spread would also be delicious, though the flavor will be slightly different.
Mini Cookie Butter Cheesecake Cups
Decadent mini cheesecakes with a Biscoff cookie crust and creamy cookie butter filling, topped with caramel and whipped cream.
Ingredients
-
1 ½ cups Biscoff cookie crumbs
-
¼ cup melted butter
-
8 oz cream cheese, softened
-
½ cup cookie butter (Biscoff spread)
-
¼ cup powdered sugar
-
½ cup heavy whipping cream
-
1 tsp vanilla extract
-
½ cup caramel sauce
-
Extra Biscoff crumbs
-
Whipped cream
-
Whole Biscoff cookies for garnish
Instructions
-
Step 1
In a bowl, combine Biscoff cookie crumbs and melted butter. Press the mixture evenly into the bottom of 12 mini muffin cups or lined muffin tin. -
Step 2
In a separate bowl, beat softened cream cheese until smooth. Add cookie butter and powdered sugar, and beat until well combined. -
Step 3
In another bowl, whip heavy cream and vanilla extract until stiff peaks form. -
Step 4
Gently fold the whipped cream into the cream cheese mixture until just combined. Do not overmix. -
Step 5
Spoon the cheesecake filling over the cookie crust in each mini muffin cup. -
Step 6
Drizzle with caramel sauce and sprinkle with extra Biscoff crumbs. -
Step 7
Chill in the refrigerator for at least 2 hours, or until firm. Garnish with whipped cream and a whole Biscoff cookie before serving.
Important Information
Nutrition Facts (Per Serving)
It is important to consider this information as approximate and not to use it as definitive health advice.
Allergy Information
Please check ingredients for potential allergens and consult a health professional if in doubt.